QTAssistant provides support for snippets in the XSD source editor. A code snippet is a fragment of text that is stored in an XML file which can be reused during XSD source editing. QTAssistant uses a technology compatible with that introduced by Microsoft in Visual Studio 2005. This means that any Visual Studio 2005 compatible XML snippet file may be used by QTAssistant.
QTAssistant has a built-in snippet editor with Intellisense support, which greatly simplifies the creation of a new snippet.
Configure the XSD Snippets Folder Location
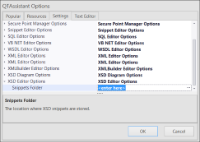
The first step is to configure the XSD Editor's Snippet Folder option. Use the Settings tab of the QTAssistant Options window, under the XSD Editor Options section.
 Configuring the XSD Snippet folder location
(Click to Enlarge)
Simple Snippet
A simple snippet consists of a static fragment of XML Schema; by static, it means that no additional input is required by the user. An example might be the following element reference used by most of the complex types in an ACORD schema.
<xsd:element ref="OLifEExtension" minOccurs="0" maxOccurs="unbounded"/>
Create the following snippet using the QTAssistant snippet editor, and save it in a file under the folder designated as the XSD snippets folder.
<?xml version="1.0" encoding="utf-8"?>
<CodeSnippet Format="1.0.0" xmlns="http://schemas.microsoft.com/VisualStudio/2005/CodeSnippet">
    <Header>
        <Title>OLifEExtension</Title>
        <Author>Paschi</Author>
        <Shortcut>olif</Shortcut>
        <Description>Creates an OLifEExtension element reference.</Description>
        <SnippetTypes>
            <SnippetType>Expansion</SnippetType>
        </SnippetTypes>
    </Header>
    <Snippet>
        <Code Language="XML"><![CDATA[<xsd:element ref="OLifEExtension" minOccurs="0" maxOccurs="unbounded"/>$end$]]></Code>
    </Snippet>
</CodeSnippet>
In the above sample, $end$ is used to mark where the user's cursor will be placed after the snippet has expanded.
Complex Snippet
A complex snippet requires the user to enter one or more values that would then be used to customize a particular instance of a snippet. Input parameters are defined as Literals under the Declarations section. Below is an example, using a pattern found in UBL instance documents.
<?xml version="1.0" encoding="utf-8"?>
<CodeSnippet Format="1.0.0" xmlns="http://schemas.microsoft.com/VisualStudio/2005/CodeSnippet">
    <Header>
        <Title>UBL Instance Document</Title>
        <Author>Paschi</Author>
        <Shortcut>ublid</Shortcut>
        <Description>The root element in an instance document.</Description>
        <SnippetTypes>
            <SnippetType>Expansion</SnippetType>
        </SnippetTypes>
    </Header>
    <Snippet>
        <Declarations>
            <Literal>
                <ID>name</ID>
                <ToolTip>Name of the root element.</ToolTip>
                <Default>Name</Default>
            </Literal>
            <Literal>
                <ID>entry</ID>
                <ToolTip>The entry name of the instance document.</ToolTip>
                <Default>Entry</Default>
            </Literal>
        </Declarations>
        <Code Language="XML"><![CDATA[<xsd:element name="$name$" type="$name$Type">
      <xsd:annotation>
         <xsd:documentation>This element MUST be conveyed as the root element in any instance document based on this Schema expression</xsd:documentation>
      </xsd:annotation>
  </xsd:element>
   <!-- ===== Type Definition ===== -->
   <!-- ===== Aggregate Business Information Entity Type Definition ===== -->
   <xsd:complexType name="$name$Type">
      <xsd:annotation>
         <xsd:documentation>
            <ccts:Component>
               <ccts:ComponentType>ABIE</ccts:ComponentType>
               <ccts:DictionaryEntryName>$entry$. Details</ccts:DictionaryEntryName>
               <ccts:Definition>The document used to specify debits made by the Debtor.</ccts:Definition>
               <ccts:ObjectClass>$entry$</ccts:ObjectClass>
            </ccts:Component>
         </xsd:documentation>
      </xsd:annotation>
      <xsd:sequence>
         <xsd:element ref="ext:UBLExtensions" minOccurs="0" maxOccurs="1">
            <xsd:annotation>
               <xsd:documentation>A container for all extensions present in the document.</xsd:documentation>
            </xsd:annotation>
         </xsd:element>
         <xsd:element ref="cbc:UBLVersionID" minOccurs="0" maxOccurs="1">
            <xsd:annotation>
               <xsd:documentation>
                  <ccts:Component>
                     <ccts:ComponentType>BBIE</ccts:ComponentType>
                     <ccts:DictionaryEntryName>$entry$. UBL Version Identifier. Identifier</ccts:DictionaryEntryName>
                     <ccts:Definition>The earliest version of the UBL 2 schema for this document type that defines all of the elements that might be encountered in the current instance.</ccts:Definition>
                     <ccts:Cardinality>0..1</ccts:Cardinality>
                     <ccts:ObjectClass>$entry$</ccts:ObjectClass>
                     <ccts:PropertyTerm>UBL Version Identifier</ccts:PropertyTerm>
                     <ccts:RepresentationTerm>Identifier</ccts:RepresentationTerm>
                     <ccts:DataType>Identifier. Type</ccts:DataType>
                     <ccts:Examples>2.0.5</ccts:Examples>
                  </ccts:Component>
               </xsd:documentation>
            </xsd:annotation>
         </xsd:element>
         <xsd:element ref="cbc:CustomizationID" minOccurs="0" maxOccurs="1">
            <xsd:annotation>
               <xsd:documentation>
                  <ccts:Component>
                     <ccts:ComponentType>BBIE</ccts:ComponentType>
                     <ccts:DictionaryEntryName>$entry$. Customization Identifier. Identifier</ccts:DictionaryEntryName>
                     <ccts:Definition>Identifies a user-defined customization of UBL for a specific use.</ccts:Definition>
                     <ccts:Cardinality>0..1</ccts:Cardinality>
                     <ccts:ObjectClass>$entry$</ccts:ObjectClass>
                     <ccts:PropertyTerm>Customization Identifier</ccts:PropertyTerm>
                     <ccts:RepresentationTerm>Identifier</ccts:RepresentationTerm>
                     <ccts:DataType>Identifier. Type</ccts:DataType>
                     <ccts:Examples>NES</ccts:Examples>
                  </ccts:Component>
               </xsd:documentation>
            </xsd:annotation>
         </xsd:element>
         <xsd:element ref="cbc:ProfileID" minOccurs="0" maxOccurs="1">
            <xsd:annotation>
               <xsd:documentation>
                  <ccts:Component>
                     <ccts:ComponentType>BBIE</ccts:ComponentType>
                     <ccts:DictionaryEntryName>$entry$. Profile Identifier. Identifier</ccts:DictionaryEntryName>
                     <ccts:Definition>Identifies a user-defined profile of the customization of UBL being used.</ccts:Definition>
                     <ccts:Cardinality>0..1</ccts:Cardinality>
                     <ccts:ObjectClass>$entry$</ccts:ObjectClass>
                     <ccts:PropertyTerm>Profile Identifier</ccts:PropertyTerm>
                     <ccts:RepresentationTerm>Identifier</ccts:RepresentationTerm>
                     <ccts:DataType>Identifier. Type</ccts:DataType>
                     <ccts:Examples>BasicProcurementProcess</ccts:Examples>
                  </ccts:Component>
               </xsd:documentation>
            </xsd:annotation>
         </xsd:element>
         <xsd:element ref="cbc:ProfileExecutionID" minOccurs="0" maxOccurs="1">
            <xsd:annotation>
               <xsd:documentation>
                  <ccts:Component>
                     <ccts:ComponentType>BBIE</ccts:ComponentType>
                     <ccts:DictionaryEntryName>$entry$. Profile Execution Identifier. Identifier</ccts:DictionaryEntryName>
                     <ccts:Definition>Identifies an instance of executing a profile, to associate all transactions in a collaboration.</ccts:Definition>
                     <ccts:Cardinality>0..1</ccts:Cardinality>
                     <ccts:ObjectClass>$entry$</ccts:ObjectClass>
                     <ccts:PropertyTerm>Profile Execution Identifier</ccts:PropertyTerm>
                     <ccts:RepresentationTerm>Identifier</ccts:RepresentationTerm>
                     <ccts:DataType>Identifier. Type</ccts:DataType>
                     <ccts:Examples>BPP-1001</ccts:Examples>
                  </ccts:Component>
               </xsd:documentation>
            </xsd:annotation>
         </xsd:element>
         <xsd:element ref="cbc:ID" minOccurs="1" maxOccurs="1">
            <xsd:annotation>
               <xsd:documentation>
                  <ccts:Component>
                     <ccts:ComponentType>BBIE</ccts:ComponentType>
                     <ccts:DictionaryEntryName>$entry$. Identifier</ccts:DictionaryEntryName>
                     <ccts:Definition>An identifier for the $entry$ assigned by the Debtor.</ccts:Definition>
                     <ccts:Cardinality>1</ccts:Cardinality>
                     <ccts:ObjectClass>$entry$</ccts:ObjectClass>
                     <ccts:PropertyTerm>Identifier</ccts:PropertyTerm>
                     <ccts:RepresentationTerm>Identifier</ccts:RepresentationTerm>
                     <ccts:DataType>Identifier. Type</ccts:DataType>
                  </ccts:Component>
               </xsd:documentation>
            </xsd:annotation>
         </xsd:element>
        $end$
      </xsd:sequence>
  </xsd:complexType>]]></Code>
    </Snippet>
</CodeSnippet>
Snippet Registration
A change to the snippet folder's content must be manually registered using the Refresh Snippets command.
 Refresh Snippets command placement
(Click to Enlarge)
Using the Snippet
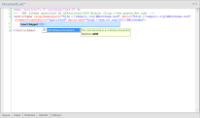
In the XSD editor, press Ctrl+K, X with the cursor position at the location where the snippet is to be inserted. Navigate the popup list and select the appropriate snippet.
 Selecting a snippet for insertion
(Click to Enlarge)
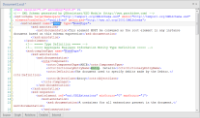
Press Enter to insert the text. Input fields are highlighted in green; fields matching the currently selected parameters have a focus rectangle shown around the text. Use the Tab key to navigate between different parameters, and Enter to accept the values entered.
 Snippet parameters
(Click to Enlarge)
References
Troelsen, Andrew W. "Investigating Code Snippet Technology", MSDN Library Technical Articles, August 2004. Web. 22 March 2014. <http://msdn.microsoft.com/en-us/library/ms379562(v=vs.80).aspx>